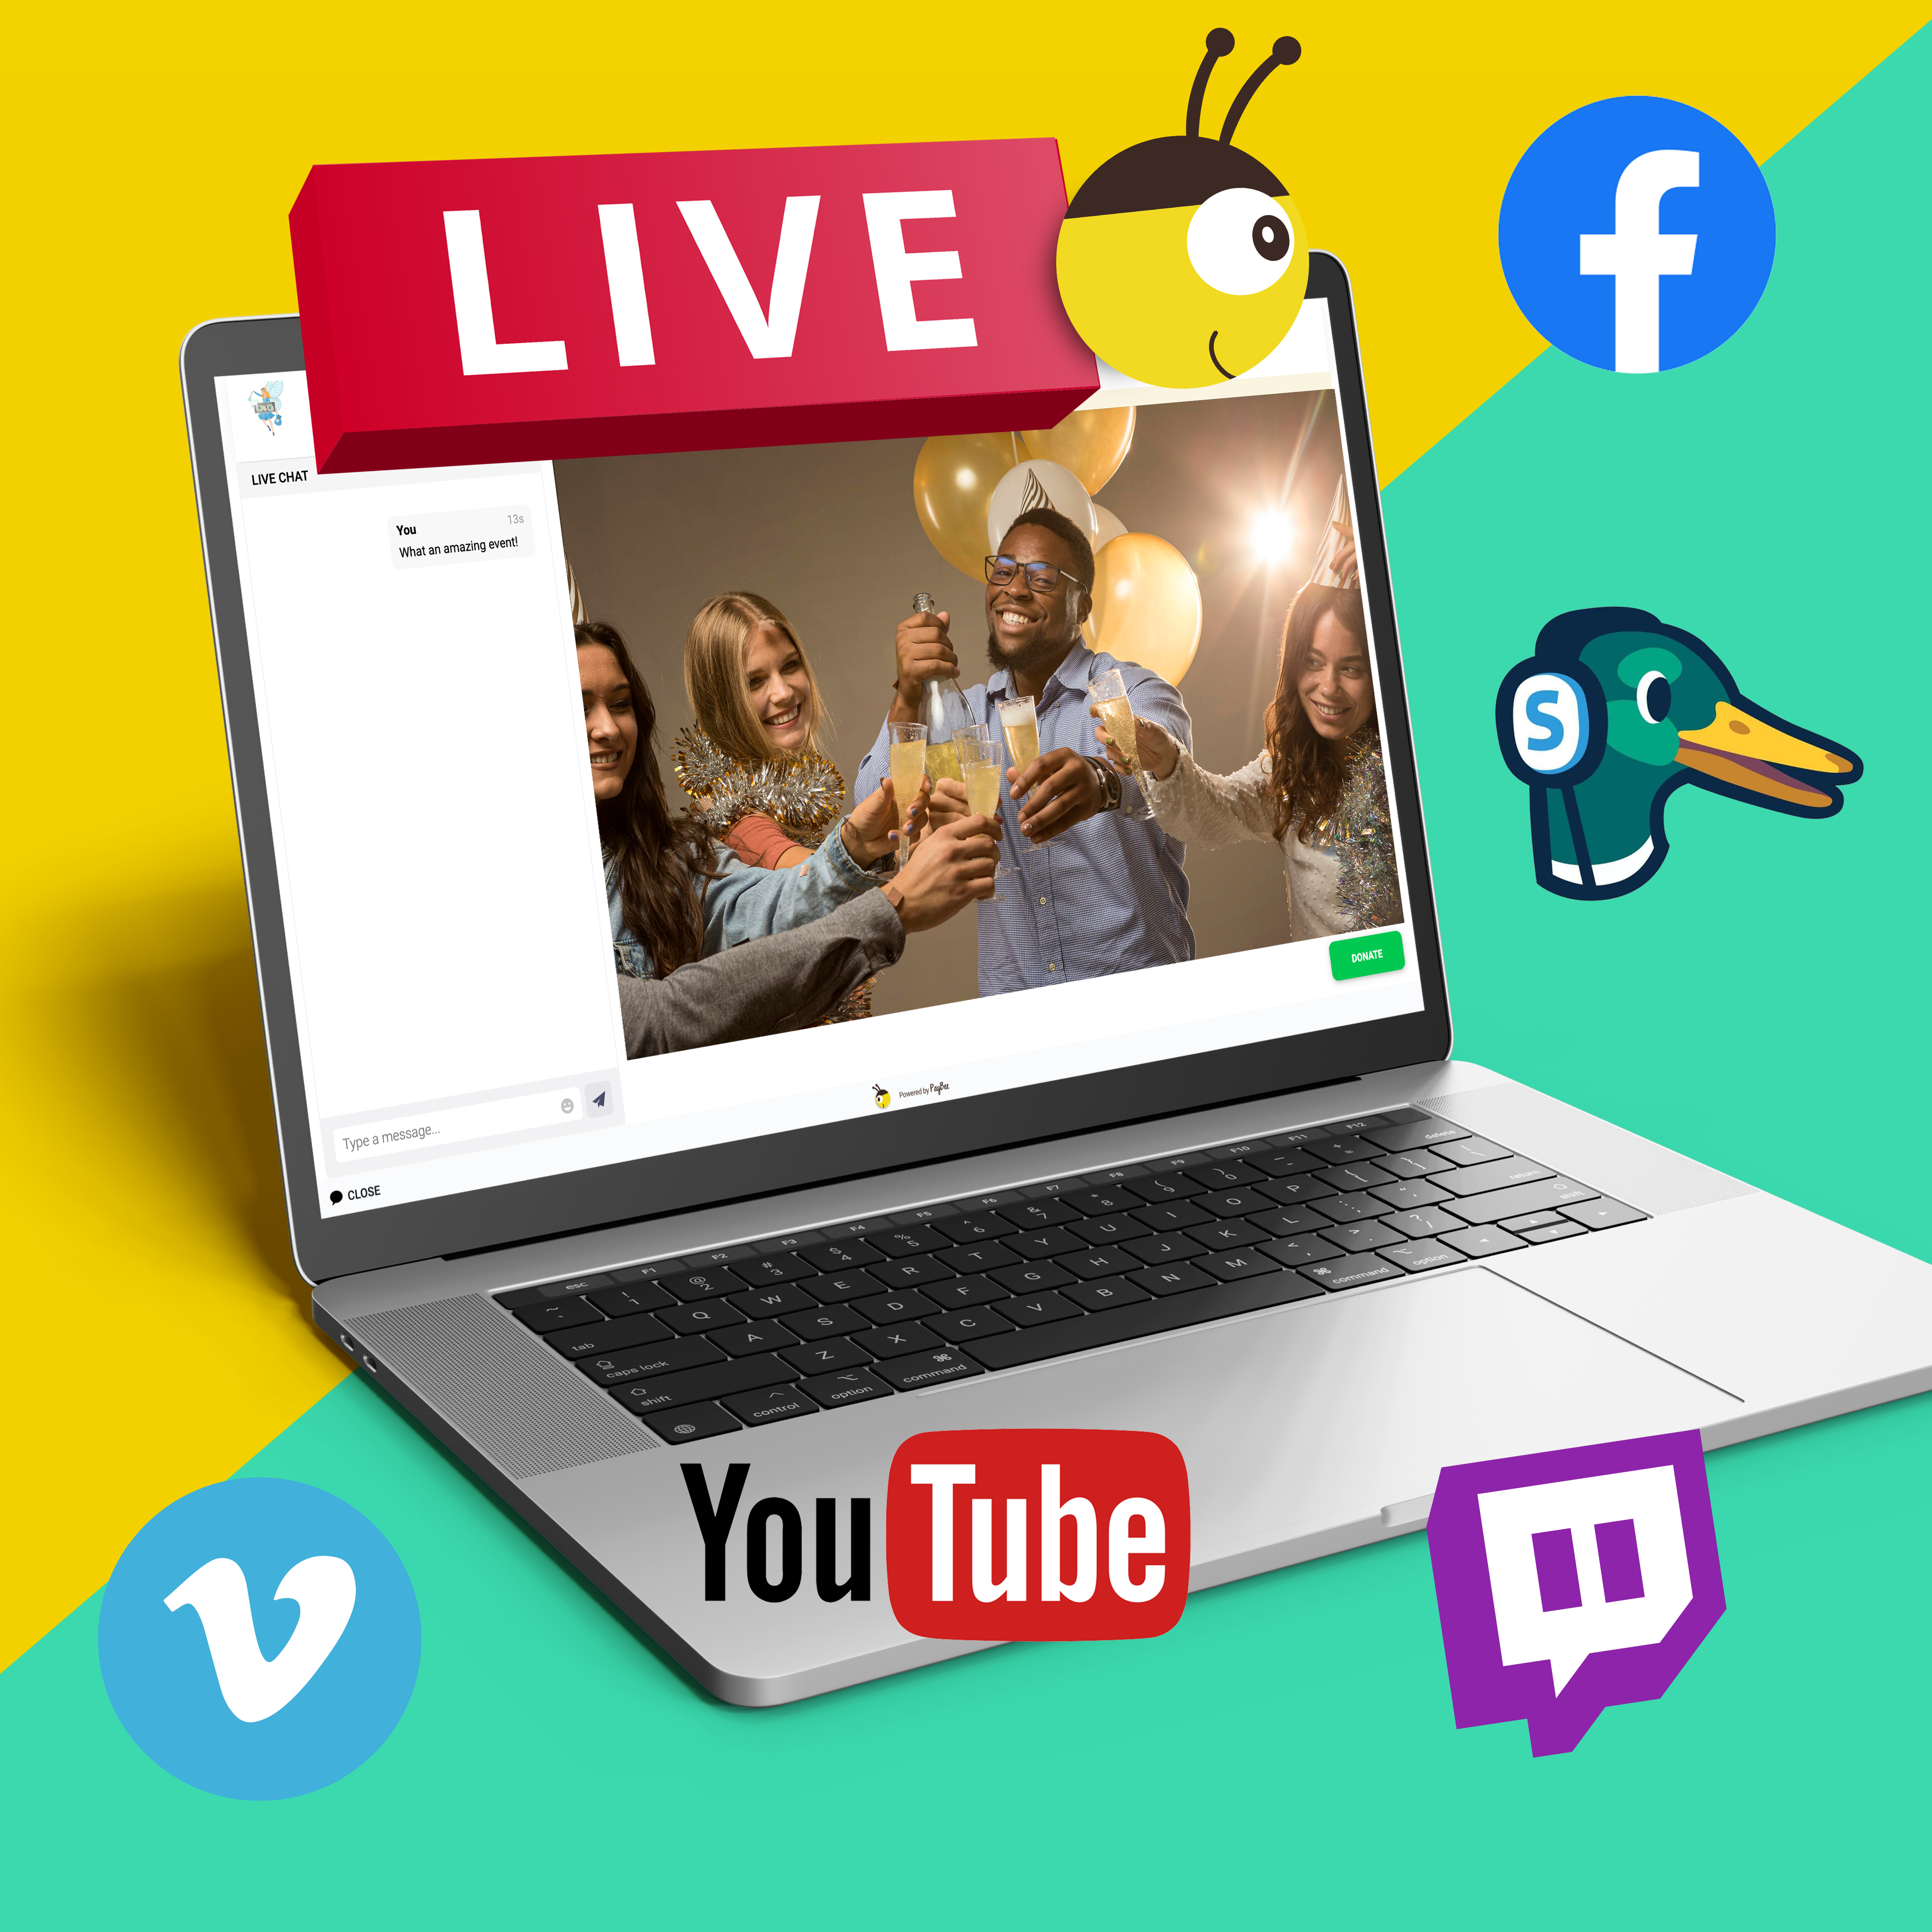
How to Livestream Your Non-Profit Virtual Gala
Choose a Livestream Platform and Setup Your Stream
YouTube Live (directly)
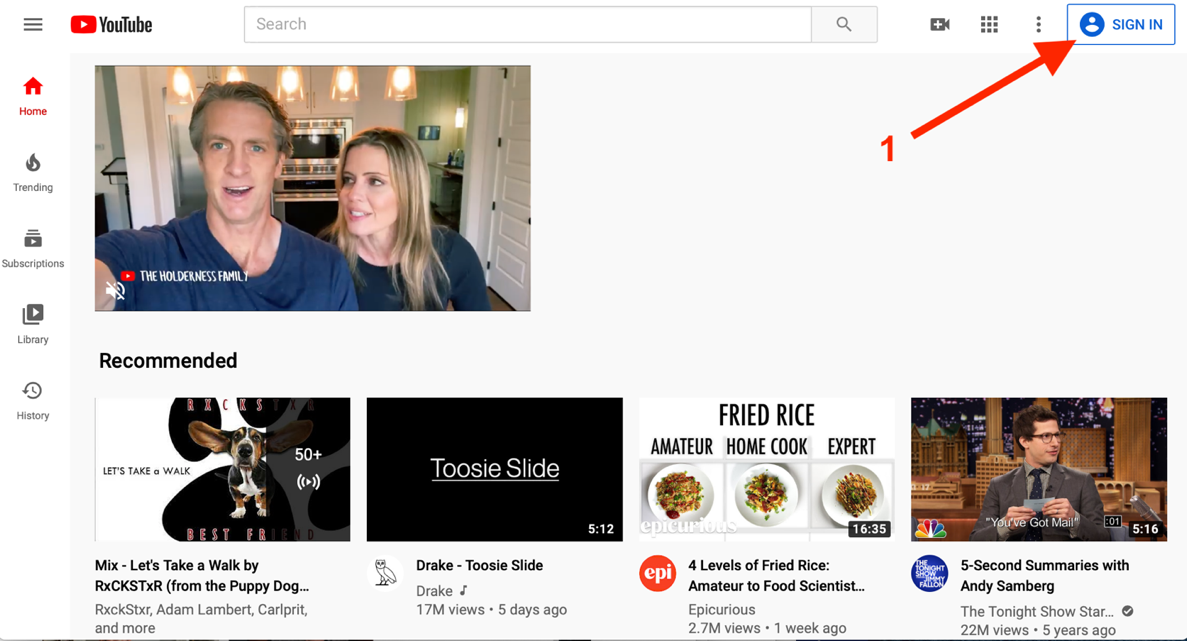
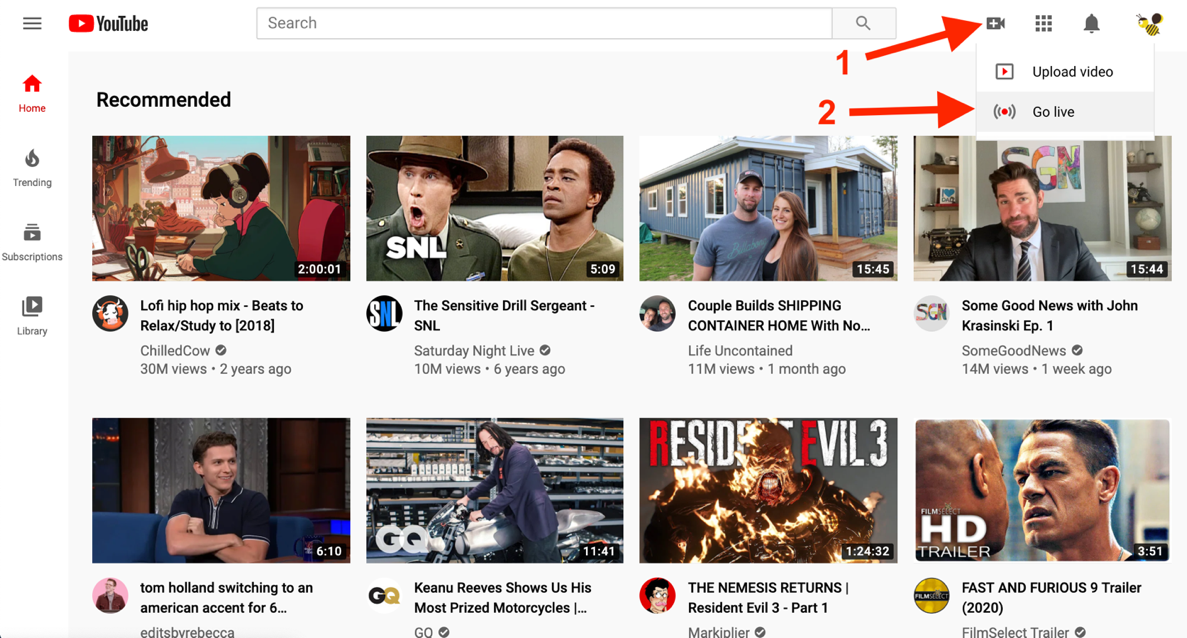
Step 1: Sign-in to Your Youtube Account
Go on https://www.youtube.com and Sign in with your Google account (1). If you don’t have one, learn how to create it https://support.google.com/accounts/answer/27441?hl=en
Step 2: Create Your Livestream
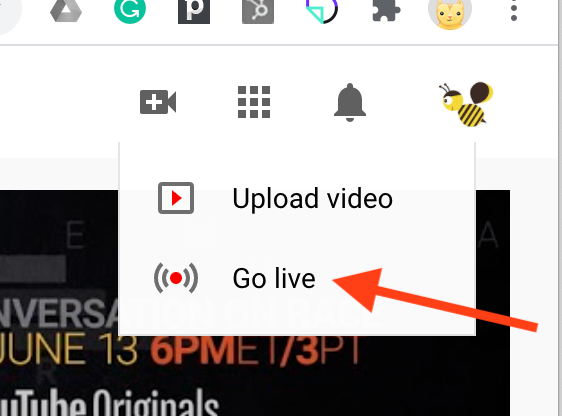
After you have logged in successfully, click on the camera icon in the top right corner of the page (1), a drop-down menu will appear. Click on GO LIVE (2).
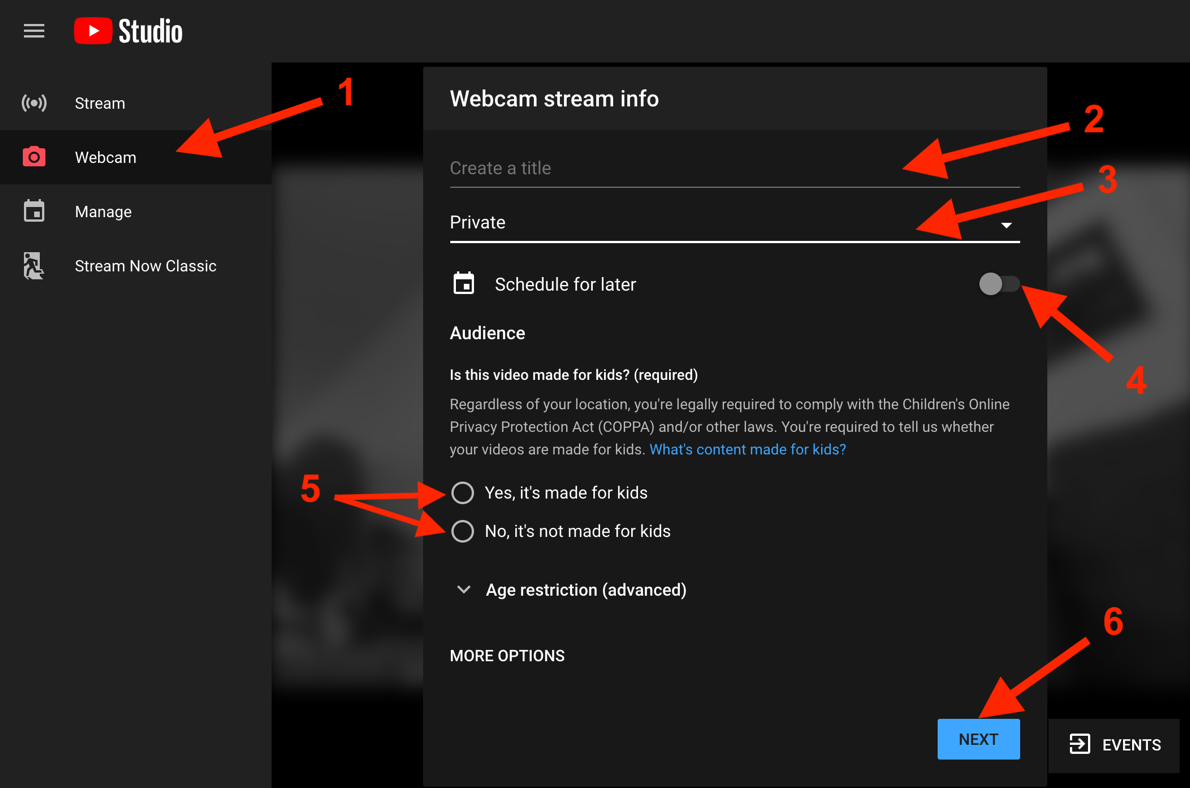
Step 3: Optimize Your Livestream Settings
Now you are in the YouTube Live Control Room. Here you will run and manage your live stream. To create a new live stream with your webcam, click on WEBCAM (1), pick a title (2), choose the privacy setting (3), If you are setting up a live stream for the future, schedule it for later (5). Select an audience (5) and hit NEXT (6).
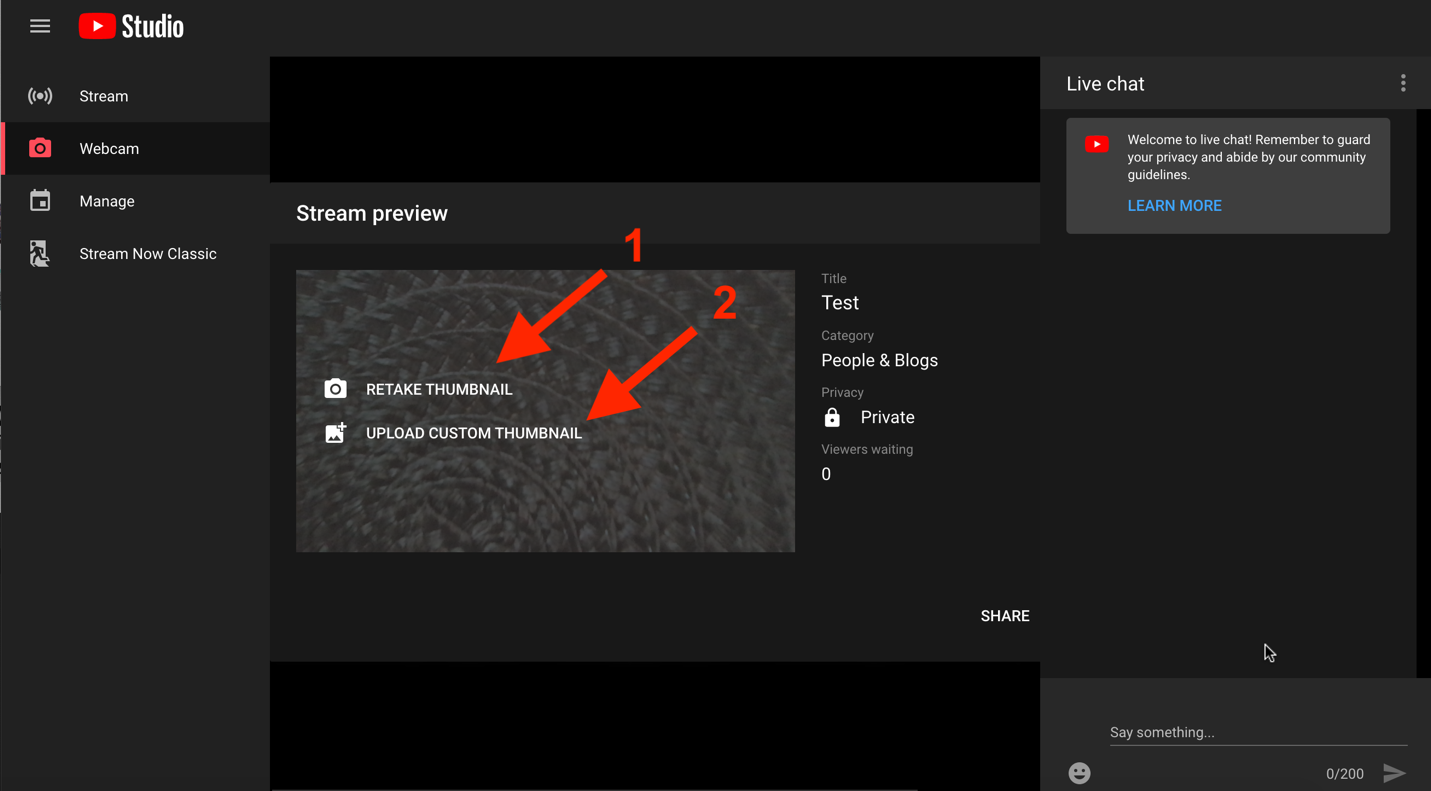
Step 4: Set Your Video Thumbnail Image
Now YouTube Studio will snap a photo from your webcam to use as thumbnail. If you don’t like it, you can retake it (1) or if you have one ready (2), you can upload it.
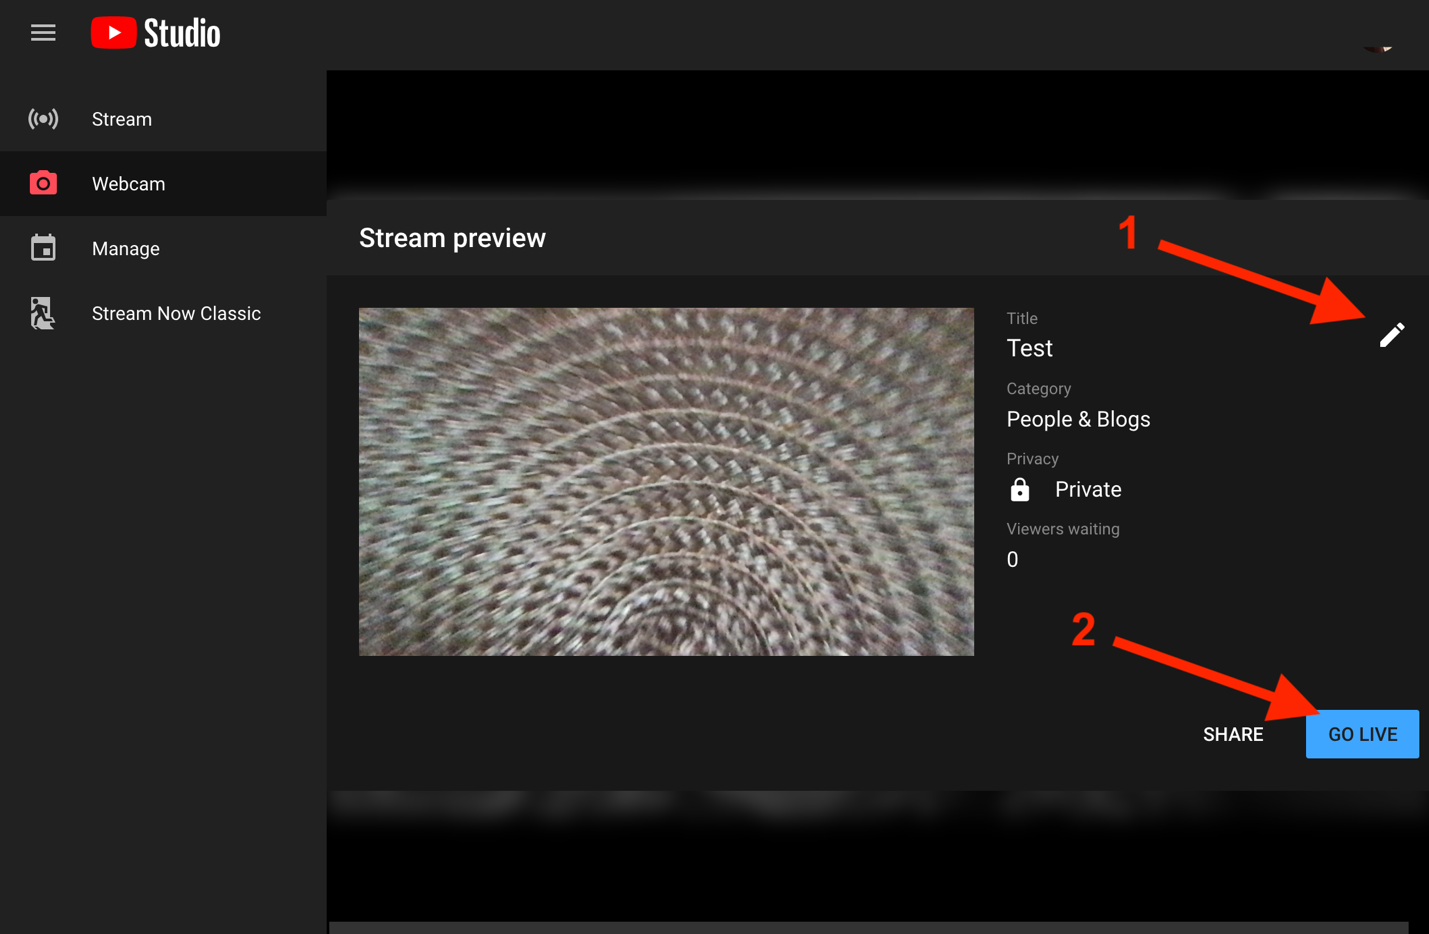
By clicking the edit icon (1) you can change the previous settings.
To share your streaming URL, click SHARE on the bottom right side of the preview, and share the URL with using the channel you prefer.
Step 5: Go Live!
If you are all set, press GO LIVE.
Now you are live!
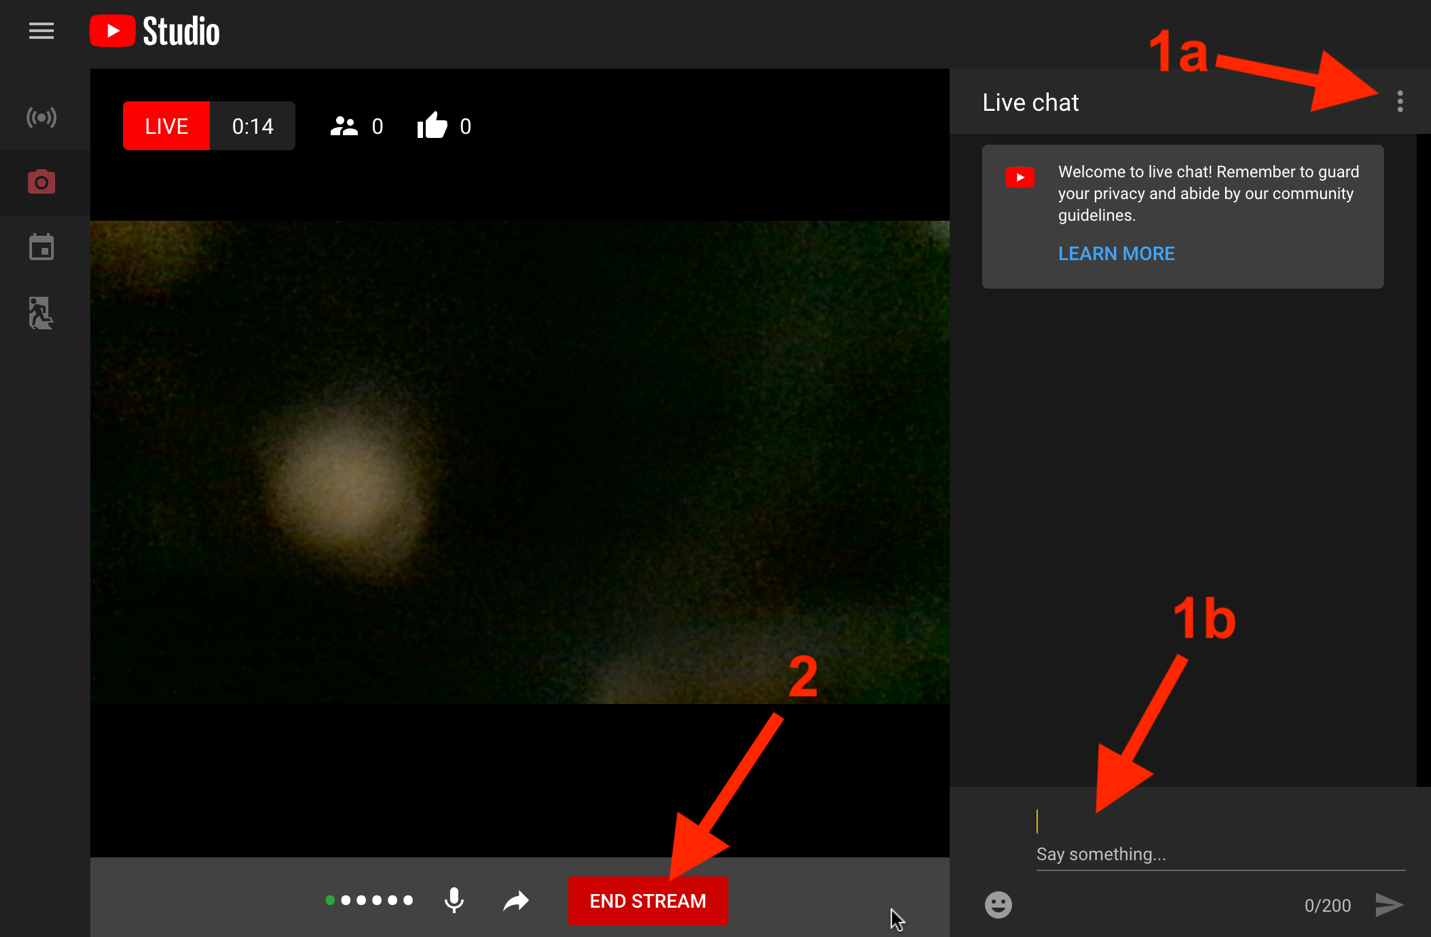
In the right side of the screen you will be able to chat with your viewers and moderate it (1a and 1b). When you are done click on END STREAM (2) and confirm your choice.
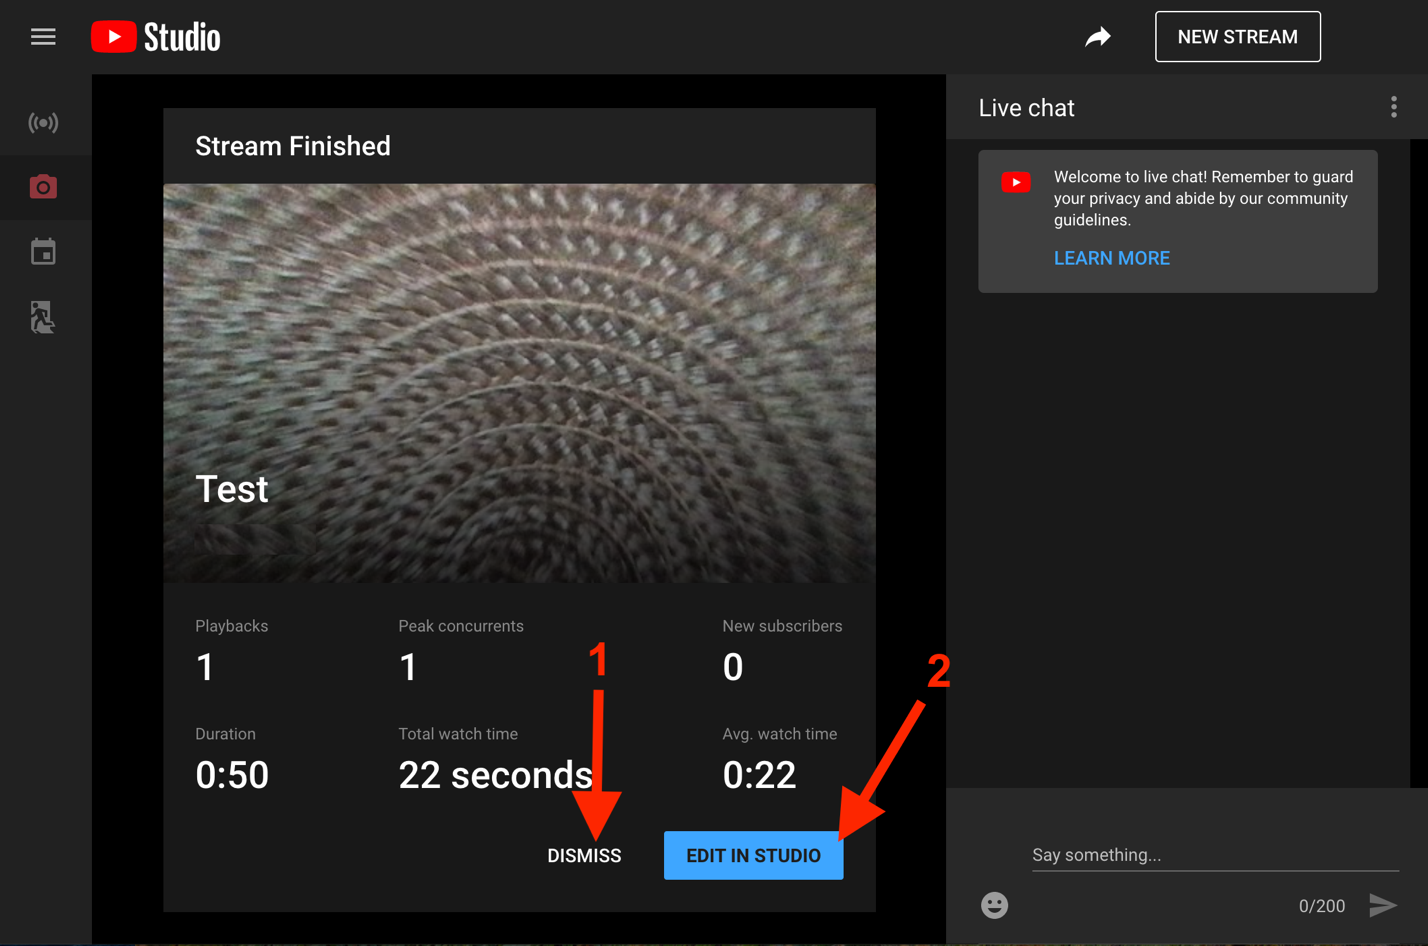
Here you can chose to edit the video before it get saved by clicking non EDIT IN STUDIO or you can click DISMISS (1) for no edits.
Stream Using Twitch
Twitch is a great alternative to use if embedding live streams is disabled on your YouTube account. It offers a 5 second delay as opposed to YouTube’s 2-3 second delay (with ultra-low latency settings). The other difference between Twitch and YouTube is that YouTube generates a new live stream link for every live stream that you set up whereas Twitch uses the same live stream link always.
Step 1: Create an account on Twitch by going to https://www.twitch.tv/
Step 2: Note your channel name so you can plug in into an embed link that will then be pasted on PayBee.
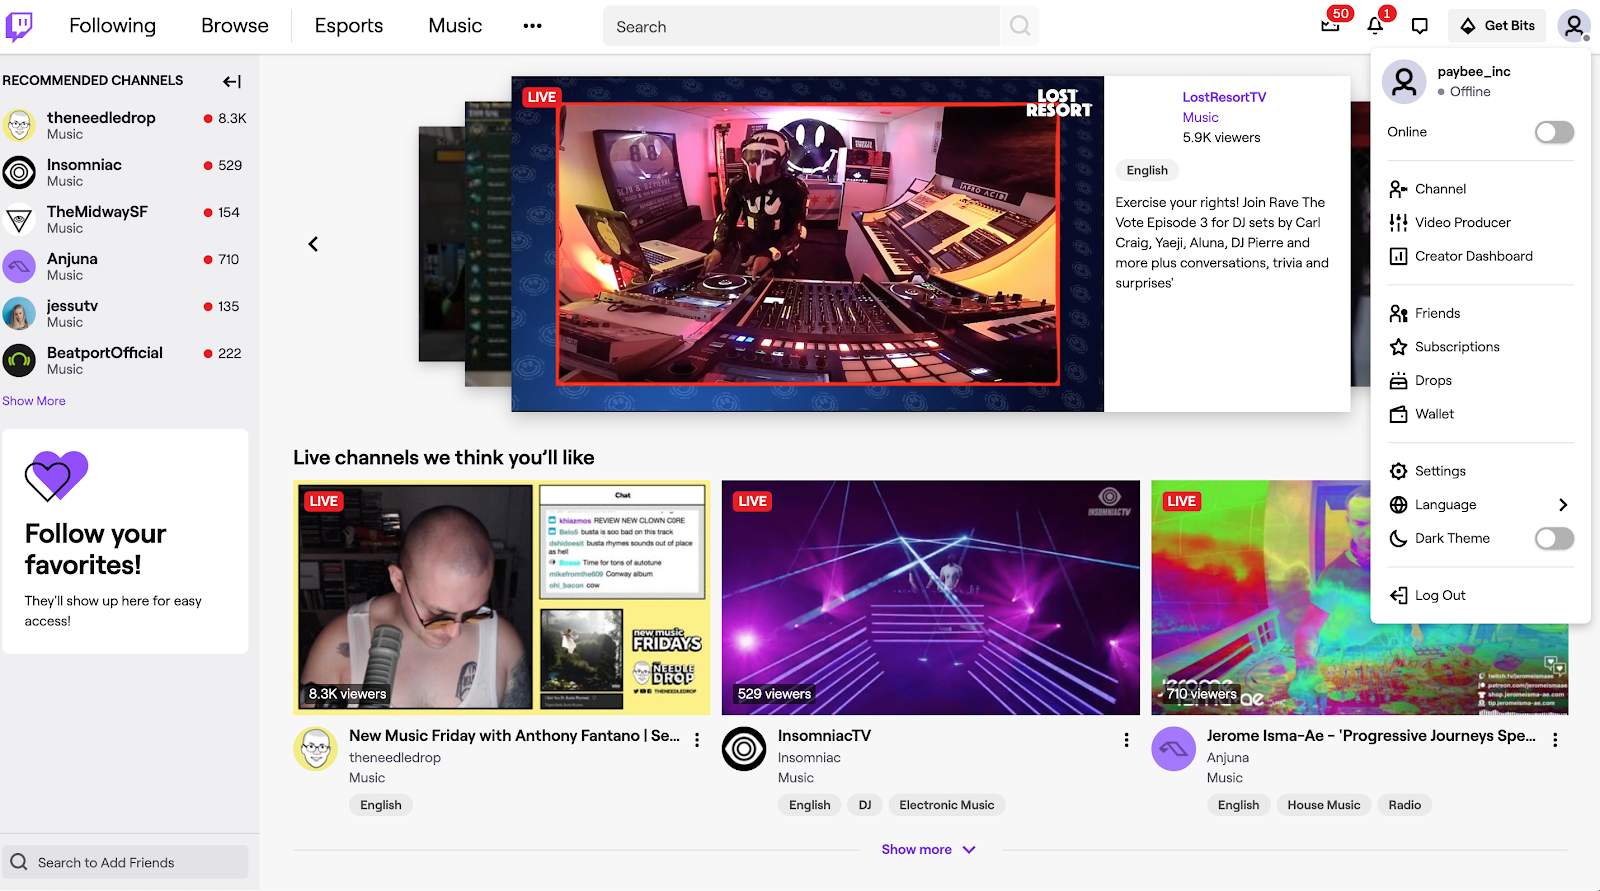
To do this, go to your homepage, tap on your account icon located on the top right corner of your screen. In the example below, you can see that the name of the channel is paybee_inc.
Step 3: Edit your embed link to incorporate your channel name.
Use the following format:
https://player.twitch.tv/?channel=channelname&parent=paybee.io
Using the above example, the embed link would be as follows:
https://player.twitch.tv/?channel=paybee_inc&parent=paybee.io
Step 4: Go back to your virtual event settings and paste the embed link as your Live Stream URL
- Log into Paybee
- Select Manage -> Virtual Events
- Tap on the green Edit button under your Virtual Events
- Change the Stream Provider to Twitch and paste the embed link in the Live Stream URL field. Tap Update to save the settings.
You have now connected Twitch to PayBee and can use platforms like StreamYard, eCamm, vMix, etc to broadcast your live stream to Twitch.
OR get the YouTube embed link via another platform (like VMix, ECamm, etc)
Using StreamYard to Manage Your Stream (can be broadcast to YouTube, Twitch, Facebook, etc)
Confirm Youtube live streaming is activated and embedding live streams is allowed
This needs to be done 24 hours before you move to the next step.
- To do this, go to Youtube, login to your account.
- Select the video button next to your channel icon and select Go Live.
- At this point, if your live streaming is not activated, you will be prompted to activate it. Do this and wait for 24 hours. If it is already active, you should see a menu on the left with options like Stream, Webcam, Manage etc. If you see this you are all set!
- Check if YouTube allows embedding live streams on your account here.
Step C: Creating an account on StreamYard:
- Go to https://streamyard.com/, select Get Started and enter your email, tap Get Login Code.
- You should now receive a 6 digit code in your email. Enter this here.
- Tap on Onward to continue.
- Add a desired destination for future broadcasts. For example, to add your Youtube channel, select Youtube and follow the steps on screen to proceed. (You will asked to login to your Youtube account and permit StreamYard to manage your Youtube account - Allow it).
- You are all set! You can continue to add other destinations in a similar way by going to Destinations on the menu to the left.
Step D: Creating a broadcast on StreamYard and connecting to PayBee:
- Go to https://streamyard.com/, select Login and enter your email.
- Go to Broadcasts. Select Create a Broadcast.
- Choose your destination. For example, select your previously added Youtube channel.
- Enter virtual event title as your title (same as the one added on PayBee), description and set privacy to Unlisted.
- Upload the image used while creating the PayBee event as your thumbnail image. Select the scheduled start time to 15 minutes before the actual event and select Create Broadcast.
- Once you are done, you should be able to see the newly created broadcast in your list of Upcoming Broadcasts.
- Select the More button on the right of Enter Broadcast Studio and select View on Youtube. This will open your upcoming broadcast’s video on Youtube
- On the video page, select Share on the right, below the video. Select Embed.
- You will see a small window pop up with some code. Copy the youtube link that shows up after src = in the code without including the quotes.
For example, in the embedded code below:

You would be copying the outlined portion ie. https://www.youtube.com/embed/6CQK0sNewS0
If you find it hard to copy, you can copy the entire code, paste it somewhere else and only select and copy the youtube link portion similar to the outlined link in the image above.
- The link that you copied in the previous step must be pasted as the ‘Live Stream URL’ mentioned in Step A. To paste it, go to PayBee, login to your organization’s account, go to Manage -> Virtual Events and select Edit on the upcoming virtual event. Paste the URL and save. You have now connected your upcoming broadcast from StreamYard to your PayBee virtual event.
DAY OF THE EVENT:
Step A: Gather all the media you to be shared during the event
- Upload all images, videos and slides from your fundraising ideas to a folder on your Google Drive if that is where you will be sharing from.
- If you are sharing images or slides from your device, open them and keep them ready to go.
- You can also show Youtube videos during live streaming. If you choose to do this, open the video on Youtube and keep it ready to go before the event starts.
Step B: Invite guests to your StreamYard broadcast
(Note: Your guests do not need accounts on StreamYard. They will just join yours when you invite them.)
- Login to StreamYard. Select the More button on the right of Enter Broadcast Studio and select Invite a guest.
- A link shows up. Copy this link to your clipboard and then paste it in your messages or email to your guests. You can also use their Default Email or Gmail options in the same window if that is easier.
Step C: Get your broadcast ready
- Once you have invited your guests. Select Enter Broadcast Studio. Allow camera/mic access and enter your Display Name. This is the name that will be displayed to your audience. You can choose to hide this in the Broadcast Studio if you want.
- Once you are inside the studio, go to Brand in the menu on the right. Here, you can choose to change the brand color, theme and background of your video if you want. You can also choose to use the default setting. If you scroll all the way through, you should be able to see an option to ‘Show display names’ or hide.
- You can also go to Banners to add any banners with text you’d like to display during the event. These banners can be used to show specific information during your livestream by tapping on ‘Show’ and ‘Hide’.
- Practice sharing your screen. Confirm that your media is open and ready to go. Select Share Screen, and choose either Application Window (if sharing media from your computer) or Chrome Tab if you are sharing media from Google drive or Youtube. If you are sharing a video with sound on your tab, make sure to select ‘Share audio’ in the bottom of the pop up window. As soon as you tap Share, your screen will be shared to the livestream. If you want to stop, tap Stop button located below on the tab/application. You can choose to stop by also going back to StreamYard and select Remove From Stream on your ‘Share Screen’ window located below.
- At this point, you can also conduct a dry run with your guests to avoid mistakes. Practice adding and removing them from the stream by tapping on ‘Add to stream’ and ‘Remove from stream’ on their windows located below.
- Once you have confirmed your dry run is complete, select Leave Studio.
- Go to the steps listed in During The Event 15 minutes before the event begins.
DURING THE EVENT:
- About 10-15 minutes before the event begins, login to StreamYard, select your upcoming broadcast, select Enter broadcast studio.
- Confirm that your media is all ready to go and your guests are invited and present in the stream.
- As soon as you receive the signal that the auctioneer has gone Live with the event on PayBee, add the respective guest to the stream and select Go Live on the top right corner of the screen. You are now Live!
- As soon as you are ready to end the event and once the auctioneer has ended the event on PayBee, Select ‘End Live’. A confirmation popup will show up. Confirm your choice to end the live stream.
Alert: Low Latency Settings Reminder
If you are using YouTube, DO NOT forget to confirm that your YouTube live stream settings are set to low latency before proceeding with the test runs and live event. If you have not changed the settings, follow these steps. This is not an issue if you are using Twitch (they should be set to low by default).
Start Fundraising